
Have you ever taken the time to perfect your makeup—blending, buffing, setting everything just right—only to wake up the next morning with an unexpected breakout? You check your skincare routine. You blame hormones. You switch foundations. But rarely do you look at the real culprit sitting quietly on your vanity: your makeup brushes.
Table of Contents
If you’ve never been shown how to wash makeup brushes properly, you’re not alone. It’s one of those beauty habits people talk about but don’t always practice. The good news? You don’t need expensive cleansers or professional tools. With simple at-home cleaning methods, you can protect your skin, extend the life of your brushes, and improve the way your makeup looks every single day.
Let’s walk through everything you need to know—step by step.
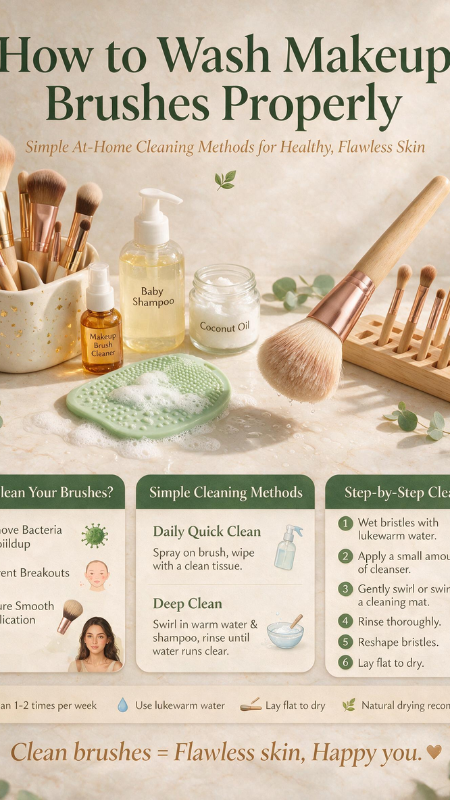
Why It’s So Important to Learn How to Wash Makeup Brushes Properly
When you use your brushes, they collect more than just pigment. Each swipe across your face transfers:
- Natural skin oils
- Dead skin cells
- Sweat
- Environmental dirt
- Bacteria
Over time, that buildup becomes a breeding ground for microbes. According to dermatology experts, unclean makeup tools can contribute to clogged pores, irritation, and acne flare-ups. Eye brushes are especially risky if left dirty for too long, as they can increase the chances of infections like conjunctivitis.
But hygiene isn’t the only reason.
When you don’t wash your brushes:
- Bristles become stiff and less flexible
- Makeup applies unevenly
- Colors look muddy instead of vibrant
- Brushes wear out faster
Clean brushes mean smoother blending, better color payoff, and healthier-looking skin. Once you see the difference, you won’t want to go back.
How Often Should You Wash Makeup Brushes?
If you’re wondering whether you’re cleaning them enough, here’s a practical guide you can follow.
General Cleaning Schedule
- Foundation & concealer brushes: 1–2 times per week
- Cream contour & blush brushes: Once a week
- Eye makeup brushes: Once a week
- Powder brushes: Every 2 weeks
- Beauty sponges: Every 2–3 days
Liquid and cream products create more buildup, so brushes used with these formulas need more frequent cleaning.
Signs Your Brushes Need Immediate Washing
Even if you follow a schedule, trust your senses. Wash your brushes if you notice:
- A sour or musty smell
- Visible product caked near the base
- Bristles clumping together
- Increased breakouts on areas where you apply makeup
If your brush doesn’t feel soft and flexible, it’s time for a refresh.
What You Need to Wash Makeup Brushes at Home
You don’t need a specialty cleanser. Most effective brush cleaning solutions are already in your kitchen or bathroom.
Basic Supplies
- Mild shampoo or baby shampoo
- Gentle dish soap (for heavy oil buildup)
- Olive oil or coconut oil
- Lukewarm water
- A small bowl
- Clean towel
That’s it. Simple and accessible.
Step-by-Step: How to Wash Makeup Brushes Properly
Let’s break it down into two methods—gentle weekly cleaning and deep cleaning for heavy buildup.
Method 1: The Shampoo Method (Gentle Weekly Clean)
This method works well for regular maintenance.
Step 1: Rinse the Bristles
Hold your brush under lukewarm water, pointing the bristles downward.
Avoid soaking the entire brush—water should not reach the handle or ferrule (the metal part). Too much moisture there can loosen the glue holding the bristles in place.
Step 2: Apply Cleanser
Pour a small amount of baby shampoo into your palm. Swirl the brush gently in circular motions.
You’ll see foundation, blush, or shadow start to lift away.
Step 3: Rinse Thoroughly
Rinse until the water runs completely clear. Take your time here—leftover soap can cause stiffness.
Step 4: Remove Excess Water
Gently squeeze the bristles with your fingers. Never twist or pull.
Step 5: Reshape and Lay Flat to Dry
Reshape the brush head. Lay it flat on a towel with the bristles slightly hanging off the edge of a counter. This allows air to circulate evenly.
Important: Never dry brushes upright while wet. Water can drip into the handle and weaken the adhesive.
Drying time usually takes 6–12 hours.
Method 2: Deep Clean with Dish Soap and Oil
If you use full-coverage foundation or long-wear products, your brushes may need a deeper cleanse.
Deep Cleaning Recipe
| Ingredient | Amount | Purpose |
|---|---|---|
| Dish Soap | 1 tablespoon | Breaks down oils & heavy makeup |
| Olive Oil | 1 tablespoon | Conditions bristles |
| Lukewarm Water | As needed | Rinsing |
How to Use It
- Mix dish soap and olive oil in a small bowl.
- Dip only the bristles into the mixture.
- Gently swirl or massage on your palm.
- Rinse until water runs clear.
- Reshape and lay flat to dry.
The oil helps keep bristles soft, especially if they’re natural hair brushes.
Natural DIY Makeup Brush Cleaners
If you prefer chemical-free options, you can disinfect brushes naturally.
Vinegar & Lemon Disinfecting Solution
| Ingredient | Amount | Benefit |
|---|---|---|
| White Vinegar | 1 part | Disinfects bacteria |
| Warm Water | 2 parts | Dilutes acidity |
| Lemon Juice | Few drops | Fresh scent & antibacterial boost |
Instructions
- Mix ingredients in a bowl.
- Swirl brush bristles briefly.
- Rinse thoroughly with water.
- Dry flat.
Make sure you rinse completely—vinegar residue can leave an odor if not removed properly.
How to Dry Makeup Brushes the Right Way
Drying might seem like a small detail, but it affects the lifespan of your tools.
Proper Drying Tips
- Always lay brushes flat
- Keep bristles hanging slightly over the edge
- Avoid direct heat or sunlight
- Do not use a blow dryer
- Ensure full drying before storing
If you store damp brushes in a container, you risk mold growth.
Patience here pays off.
Common Mistakes to Avoid
Even if you know how to wash makeup brushes properly, small mistakes can cause damage.
Avoid These Errors:
- Soaking entire brushes in water
- Using very hot water
- Pulling on bristles aggressively
- Skipping regular cleaning
- Using harsh alcohol repeatedly
Alcohol can disinfect but may dry out bristles if used too often.
How to Store Brushes After Cleaning
Once your brushes are completely dry, storage matters.
Best Storage Practices
- Store upright in a clean container
- Keep them away from humidity
- Use brush guards to maintain shape
- Avoid overcrowding
If your bathroom gets steamy, consider storing brushes in your bedroom instead.
Dust and moisture are enemies of clean tools.
Pro Tips to Keep Makeup Brushes Cleaner Longer
You don’t have to deep clean constantly if you build smarter habits.
Simple Habits That Make a Big Difference
- Wipe excess product off brushes after each use.
- Use a daily quick-clean spray between washes.
- Avoid sharing brushes.
- Wash your hands before applying makeup.
- Keep brush handles clean as well.
Small steps help reduce bacteria buildup significantly.
What Happens When You Start Washing Brushes Regularly?
Once you commit to proper cleaning, you’ll likely notice:
- Fewer breakouts
- Smoother foundation application
- More vibrant eyeshadow blending
- Softer brush texture
- Longer-lasting tools
Clean brushes truly transform your routine.
FAQ: How to Wash Makeup Brushes Properly
How to wash makeup brushes properly without shampoo?
You can use gentle dish soap mixed with olive oil to remove makeup and bacteria effectively. Rinse thoroughly and dry flat.
How often should you wash makeup brushes to prevent acne?
Foundation and concealer brushes should be washed at least once a week. If you’re acne-prone, consider washing them more frequently.
Can you wash makeup brushes with just water?
Water alone won’t remove oils or bacteria. You need a mild cleanser to break down product buildup.
What is the fastest way to wash makeup brushes at home?
A quick-dry brush spray works for spot cleaning between deep washes, but it doesn’t replace weekly cleansing.
Is it safe to wash makeup brushes every day?
Yes, especially for brushes used with liquid products. Just use gentle cleansers to avoid damaging bristles.
Your Skin Deserves Clean Tools
Learning how to wash makeup brushes properly isn’t complicated—but it makes a real difference. Clean brushes protect your skin, improve your makeup results, and save you money in the long run by extending the life of your tools.
You already invest time and effort into your skincare routine. Adding regular brush cleaning takes just a few extra minutes each week, yet it can dramatically improve your results.
Start today.
Pick up one brush. Wash it properly. Feel how soft it becomes. Notice how much better your makeup applies tomorrow.
Your skin is worth it.
If you found this guide helpful, share it with a friend who loves makeup—or bookmark it as your go-to cleaning reference. Clean brushes, clear skin, confident you.