
Cat eye nail polish contains tiny, iron-based particles that react to a magnet. Hold a nail magnet over the wet polish, and those particles form a reflective band. You get a dimensional design without painting detailed nail art.
The technique looks simple, but timing matters. If the polish sets too soon, the magnetic line can appear dull. Your magnet’s strength and position also affect the final result.
Here’s how cat eye polish works, what you need, and how to apply it.
Table of Contents
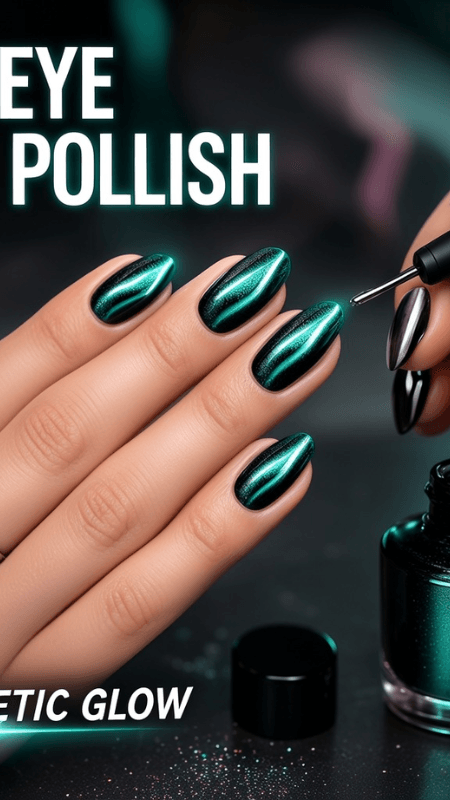
What Is Cat Eye Nail Polish?
Cat eye nail polish is a magnetic polish with responsive metallic particles. A magnet moves those particles while the product remains wet or uncured.
The result is a concentrated stripe or glow. It shifts as your hand moves under the light.
The name comes from cat’s-eye gemstones. These stones have a narrow, reflective band across their surface. That optical effect is known as chatoyancy.
On a product label, you may see ingredients such as:
- Iron powder
- Iron oxides, including CI 77499
- Mica
- Synthetic fluorphlogopite
- Aluminum pigments
- Color-shifting pigments
Mica and aluminum can add sparkle. However, they are not always magnet-responsive. The formula still needs a magnetic material to create movement.
What Does a Cat Eye Manicure Look Like?
The classic version has a bright diagonal stripe. The surrounding color appears darker, creating a gemstone effect.
Modern cat eye manicures offer many other finishes:
- Vertical lines that visually lengthen your nails
- Velvet effects with an all-over glow
- Halo designs with a bright center
- Magnetic French tips
- Galaxy-inspired waves
- Multichrome color shifts
- Soft, sheer “glass” cat eye nails
Your base color changes the final mood. Black creates bold contrast. A matching base produces a softer, more seamless finish.
Is Cat Eye Nail Polish Always Gel?
No. You can buy cat eye polish as gel or air-dry lacquer.
Gel is usually easier to control. It remains movable until you cure it under a lamp. You can adjust the pattern several times before curing.
Regular magnetic lacquer starts drying straight away. You need to position the magnet quickly. It works without a lamp, but you have less correction time.
Traditional lacquer often contains nitrocellulose, ethyl acetate, and butyl acetate. Gel formulas usually contain acrylate oligomers, monomers, and photoinitiators.
How Does Magnetic Cat Eye Nail Polish Work?
A nail magnet attracts and aligns the iron-based particles inside the polish. Those particles gather into a stripe, curve, or concentrated glow.
The magnet should never touch your nail. Hold it a few millimeters above the surface.
Once the gel cures, the particles become locked in place. Air-dry lacquer fixes the pattern as its solvents evaporate.
The design seems to move because the particles reflect light from different angles. Your viewing angle changes when you turn your hand. That creates the familiar three-dimensional flash.
Cat Eye Nail Polish Types Compared
| Formula or Finish | Lamp Needed? | Working Time | Design Control | Typical Wear | Best For |
|---|---|---|---|---|---|
| Cat eye gel polish | Yes | Until cured | High | About 10–21 days | Sharp, adjustable designs |
| Air-dry magnetic lacquer | No | Short | Moderate | About 3–7 days | Lamp-free manicures |
| Velvet cat eye | Depends on formula | Varies | Moderate to high | Depends on formula | An even, plush glow |
| Multichrome cat eye | Usually, but not always | Varies | High | About 7–21 days | Dramatic color shifts |
| Standard shimmer polish | Depends on formula | Varies | No magnetic control | About 3–14 days | Simple sparkle |
Velvet and multichrome describe finishes rather than separate polish systems. Always check whether the bottle contains gel or traditional lacquer.
If you are new to magnetic nails, gel offers more working time. Choose lacquer if you prefer to avoid a curing lamp.
What You Need for a Cat Eye Manicure
You do not need a large professional kit. However, your products must suit the same nail system.
Essential Products and Tools
- Cat eye gel or magnetic lacquer
- A strong nail magnet
- Compatible base coat
- Optional black or coordinating polish
- Compatible top coat
- Nail file and fine buffer
- Cuticle pusher
- Lint-free wipes
- Nail cleanser or isopropyl alcohol
- LED or UV lamp for gel
- Acetone and foil wraps for gel removal
- Cuticle oil containing jojoba or squalane
Use a fine buffer designed for natural nails. Aggressive filing can make your nails thin and tender.
Choosing the Right Nail Magnet
Your magnet matters as much as your polish. Weak tools produce blurred or barely visible effects.
Common options include:
- Rectangular bar magnet: Best for straight and diagonal lines.
- Round magnet: Useful for halos, curves, and concentrated spots.
- Dual-ended wand: Offers a bar and round magnet together.
- U-shaped magnet: Helps create velvet or all-over magnetic finishes.
- Magnetic pen: Useful for waves and smaller details.
Test your magnet on a plastic swatch first. This shows how the particles respond to each side.
Keep the tool around 2–5 millimeters above the wet polish. Getting closer creates a faster reaction. Do not let the magnet hit the surface.
Do You Need a Black Base Coat?
A black base is optional. It creates the strongest contrast and deepest background.
Try these base combinations:
- Black under green, blue, purple, or red
- Navy under icy blue
- Burgundy under red or copper
- Nude under champagne or silver
- A matching shade for a smooth tonal effect
Some opaque cat eye polishes provide full coverage alone. Sheer formulas usually look stronger over a colored base.
How to Apply Cat Eye Nail Polish
The magnetic layer requires your full attention. Work on one nail at a time, especially with gel.
Step-by-Step Application
- Prepare your nails Remove old polish and shape each nail. Gently push back your cuticles. Lightly buff only if your system requires it. Remove every trace of dust. Clean the nail plate with a lint-free wipe. Avoid soaking your hands before applying gel. Water can temporarily swell the nail plate.
- Apply your base coat Paint a thin, even layer. Keep it away from your skin and cuticles. Cure gel base coat for the manufacturer’s stated time. Let regular base coat dry before continuing.
- Add your background color Apply black for strong contrast. Use a matching shade for a softer result. Cure or dry the background completely. One or two thin coats should be enough.
- Apply the cat eye polish Paint a thin, even magnetic layer. Do not cure it yet. If the formula requires two coats, set the first one normally. Create the magnetic design in the final color coat.
- Position your magnet Hold the magnet 2–5 millimeters above the nail. Keep it steady for 5–15 seconds over gel. Air-dry lacquer may need 20–30 seconds. Follow the bottle’s directions because formulas vary.
- Set the pattern Cure gel immediately after you like the effect. Delays allow the particles to spread again. Let magnetic lacquer dry without bumping the nail. Keep your hand level during this stage.
- Repeat if needed Add another thin coat if the color looks patchy. Magnetize that layer before curing or drying.
- Apply top coat Seal your design with a compatible top coat. Cure gel for the stated time. Float regular top coat over the nail with minimal brush strokes. Repeated brushing can disturb the design.
- Finish your manicure Remove any tacky gel residue if the system requires it. Apply cuticle oil once the manicure is complete.
How to Create the Classic Cat Eye Line
Diagonal Stripe
Hold a bar magnet at a 45-degree angle. Watch the shimmer gather into a diagonal flash.
Keep the magnet still once the line appears. Cure or dry the nail promptly.
Vertical Stripe
Position the magnet lengthwise over the center. Adjust its angle until the particles form a vertical band.
This pattern can make short nails appear longer.
Curved Gemstone Effect
Use the round end of a magnetic wand. Guide the particles inward from the sides.
You may need several short movements. Stop when the center looks bright and curved.
How to Create Popular Cat Eye Effects
Velvet Cat Eye
Velvet nails have an even glow instead of one sharp line. They look soft under direct light.
A U-shaped or horseshoe magnet makes this design easier. Place your finger inside the opening without touching the polish. Hold it still until the shimmer spreads evenly.
With a bar magnet, work around both sides and the tip. Cure the nail before the particles relax.
Halo or Aura Effect
Use a round magnet to concentrate shimmer near the center. Then shape the edges with small movements.
Keep the perimeter darker. That contrast gives the design more depth.
Magnetic French Tips
Apply cat eye polish over the full nail or just the free edge. Pull the magnetic pigment toward the tip.
A detail brush can sharpen the French line. Cap the free edge with top coat to reduce chipping.
Galaxy and Wave Designs
Use the narrow edge of your magnet. Create one or two curved bands across the nail.
Multichrome formulas work well for this design. A navy or black base makes the color shift clearer.
Avoid moving the magnet too many times. Overworking the polish can blur your pattern.
Common Cat Eye Nail Polish Mistakes
The Magnetic Line Looks Weak
Several issues can cause a faint result:
- The pigment settled inside the bottle
- Your polish layer is too thin
- The magnet is too far away
- The magnet is weak
- The lacquer has started drying
- The formula contains fewer magnetic particles
Roll the closed bottle gently between your palms. Do not shake it aggressively, since that may create bubbles.
Apply a fresh layer and move the magnet closer. A stronger nail magnet may solve the issue immediately.
The Effect Disappears After Curing
Magnetic particles can spread while you move your hand toward the lamp. That softens the line.
Magnetize one nail and cure it straight away. Keep the lamp nearby so you do not waste time.
The Magnet Touches the Polish
A magnet can dent the surface or pull away wet product. Smooth the mark with your brush.
If the finish remains uneven, apply another thin layer. Repeat the magnetic step with more clearance.
Every Nail Looks Different
Use the same angle, height, and timing on every nail. Rest your hand on a stable table.
You can mark the magnet’s position with a small piece of tape. This gives you a repeatable reference point.
The Gel Wrinkles or Feels Soft
Thick layers often cure unevenly. An incompatible lamp can create the same problem.
Do not cover soft gel with more top coat. Remove it and start again with thinner layers.
Use the lamp recommended by the polish manufacturer. A higher wattage does not always mean a proper cure.
How to Make Your Manicure Last Longer
Good preparation gives you better wear than adding thick coats.
Follow these habits:
- Keep every layer thin
- Avoid getting gel on your skin
- Remove oil and dust before applying base coat
- Use products from compatible systems
- Cap the free edge when the brand recommends it
- Follow the exact curing or drying time
- Wear gloves while cleaning
- Avoid long periods in hot water
- Apply jojoba or squalane cuticle oil daily
- Never pick at lifting gel
If one edge starts lifting, do not glue it down. Trapped moisture can create additional problems.
How to Remove Cat Eye Nail Polish Safely
Removing Air-Dry Magnetic Lacquer
Saturate a cotton pad with nail polish remover. Press it against the nail for several seconds.
Wipe toward the free edge. Repeat with a fresh pad if pigment remains.
Acetone works fastest on dark or glitter-heavy formulas. Apply cuticle oil afterward to reduce dryness.
Removing Soak-Off Cat Eye Gel
Lightly file away the shiny top-coat seal. Do not file into your natural nail.
Place acetone-soaked cotton on each nail. Secure it with foil or reusable removal clips.
Wait for the time recommended by the brand. This is often around 10–15 minutes.
Gently slide away softened gel. Rewrap any stubborn areas instead of scraping them.
Never peel gel from your nails. Peeling can remove layers of the natural nail plate.
Hard gel does not dissolve in acetone. Book a professional removal if the product stays solid.
Safety Notes for At-Home Gel Nails
Uncured gel should not touch your skin. Repeated exposure can increase your risk of an acrylate allergy.
Some formulas contain HEMA or di-HEMA trimethylhexyl dicarbamate. HEMA-free polish can still contain other reactive acrylates. It is not allergy-proof.
Clean accidental skin contact before curing. Never use gel polish for a homemade skin patch test.
Also, use the correct lamp for your chosen product. Polish that looks hard may still be undercured underneath.
Stop using gel if you develop:
- Itching
- Redness
- Swelling
- Blisters
- Nail separation
- Burning or persistent tenderness
Contact a dermatologist if symptoms continue. Avoid applying another nail product over irritated skin.
If lamp exposure worries you, wear UV-protective fingerless gloves. You can also apply broad-spectrum SPF 30 to your hands. Keep sunscreen off the prepared nail plates.
Is Cat Eye Nail Polish Worth Trying?
Cat eye polish gives you detailed-looking nail art with little brushwork. The classic stripe is friendly for beginners.
Gel offers the greatest control. Regular magnetic lacquer works better if you avoid lamps.
Start with an opaque shade and a rectangular magnet. Practice a diagonal line on a swatch before painting your nails.
Frequently Asked Questions About Cat Eye Nail Polish
How does cat eye nail polish work?
A magnet moves iron-based particles inside the wet or uncured polish. Those particles form a reflective, light-shifting pattern.
Can you use cat eye nail polish without a magnet?
Yes, but it will look like ordinary shimmer polish. You need a magnet for the concentrated cat eye effect.
Does cat eye nail polish need a UV or LED lamp?
Cat eye gel needs a compatible lamp. Air-dry magnetic lacquer does not require one.
Why is my cat eye nail polish not working?
Your magnet may be weak, too far away, or used too late. Settled pigment and very thin coats can also weaken the effect.
Ready to try the technique? Share your favorite cat eye shade or current nail routine in the comments.